Widgitの配置(pack)
はじめに
tkinterを使ってアプリを作ったのであるが、マルチプラットフォームだと思っていたが、意外と画面構成が崩れる。思い通りに配置できない。等など、とても困ったので、お勉強し直しついでに、まとめてみた。
まず、Tkinterについておさらい、Python における GUI パッケージで標準インストール。ただし、macOSにはTcl/Tkが標準インストールされていない? バージョンが古い?ちゃんと動かなかったので、別途インストールする必要があった。
(随分前に対応したのでよく覚えていない、最近Ubuntuばかりいじっているし...)
突如出てきたTcl/Tkとは? Tclとはスクリプト言語。これでGUIを開発するためのツールキットTkをあわせて、Tcl/Tkといい、これをPythonから利用できるようにしているのがtkinterとなる。
したがって、具体的な事を調べるために資料を求めるとTck/Tkをあたらなければならない。tkinterのオフィシャルサイトを見ても具体的なことはほとんど書いていないのである。
こんな認識で合っているかな?では、常用していたpackから。
packとは
packはWidgitをウィンドウ内やフレーム内に配置する方法の一つ。他にgridやplaceがある。
オプション
Tck/TKのページからコピーしてきた。全部使えるか試してないけど、たぶん大丈夫。
| オプション | 機能 |
|---|---|
| after Other | Other must the name of another window. Use its container as the container for the content, and insert the content just after Other in the packing order. |
| anchor Anchor | Anchor must be a valid anchor position such as n or sw; it specifies where to position each content in its parcel. Defaults to center. |
| before Other | Other must the name of another window. Use its container as the container for the content and insert the content just before other in the packing order. |
| expand boolean | Specifies whether the content should be expanded to consume extra space in their container. Boolean may have any proper boolean value, such as 1 or no. Defaults to 0. |
| fill style | If a content's parcel is larger than its requested dimensions, this option may be used to stretch the content. Style must have one of the following values: none: Give the content its requested dimensions plus any internal padding requested with -ipadx or -ipady. This is the default. x: Stretch the content horizontally to fill the entire width of its parcel (except leave external padding as specified by -padx). y: Stretch the content vertically to fill the entire height of its parcel (except leave external padding as specified by -pady). both: Stretch the content both horizontally and vertically. |
| in_ container | Insert the window at the end of the packing order for the container window given by container. |
| ipadx Amount | Amount specifies how much horizontal internal padding to leave on each side of the content. Amount must be a valid screen distance, such as 2 or .5c. It defaults to 0. |
| ipady Amount | Amount specifies how much vertical internal padding to leave on each side of the content. Amount defaults to 0 |
| padx Amount | Amount specifies how much horizontal external padding to leave on each side of the content. Amount may be a list of two values to specify padding for left and right separately. Amount defaults to 0. |
| pady Amount | Amount specifies how much vertical external padding to leave on each side of the content. Amount may be a list of two values to specify padding for top and bottom separately. Amount defaults to 0. |
| side side | Specifies which side of the container the content will be packed against. Must be left, righ, top, or bottom. Defaults to top. |
具体例
まずは基本、以下のようなプログラムを書いてみた。
300×300のフレームにボタンを4つ配置するプログラムである。
|
1 2 3 4 5 6 7 8 9 10 11 12 13 14 15 16 17 18 19 20 |
import tkinter as tk root = tk.Tk() root.title('example pack') root.geometry('300x300') frame = tk.Frame(root) frame.pack(expand=True, fill=tk.BOTH) btn1 = tk.Button(frame, text="ボタン1") btn2 = tk.Button(frame, text="ボタン2") btn3 = tk.Button(frame, text="ボタン3") btn4 = tk.Button(frame, text="ボタン4") btn1.pack() btn2.pack() btn3.pack() btn4.pack() root.mainloop() |
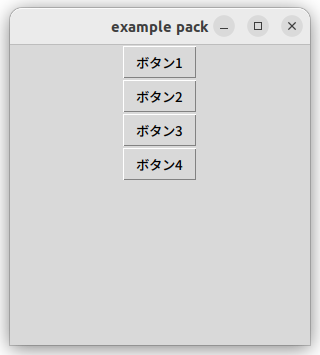
packのデフォルト値が選択され、左のように配置される。
sideの例
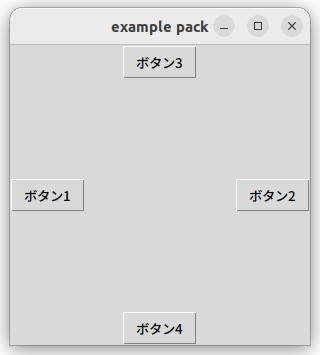
まずはsideオプションから使ってみる。packを使って各辺に配置してみましょう。わざと"right"だけ文字列を引数にしているところもあるけど、もちろん”tk.RIGHT”で指定も出来る。
|
1 2 3 4 |
btn1.pack(side=tk.LEFT) btn2.pack(side="right") btn3.pack(side=tk.TOP) btn4.pack(side=tk.BOTTOM) |
これを実行すると右のようなウィンドウが表示されます。
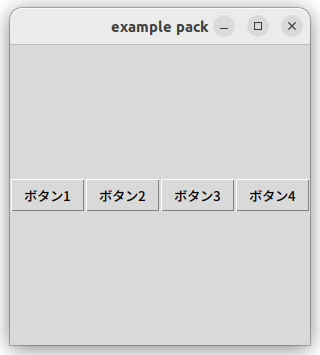
では、次のように全部左、上などにするとどうなるか?
全部"top"はデフォルトと同じですね。積み重なる。
|
1 2 3 4 |
btn1.pack(side=tk.LEFT) btn2.pack(side=tk.LEFT) btn3.pack(side=tk.LEFT) btn4.pack(side=tk.LEFT) |
|
1 2 3 4 |
btn1.pack(side="top") btn2.pack(side="top") btn3.pack(side="top") btn4.pack(side="top") |

anchorの例
anchorを説明するのに最初の例を使ってみましょう。
|
1 2 3 4 |
btn1.pack(side=tk.LEFT) btn2.pack(side="right") btn3.pack(side=tk.TOP) btn4.pack(side=tk.BOTTOM) |
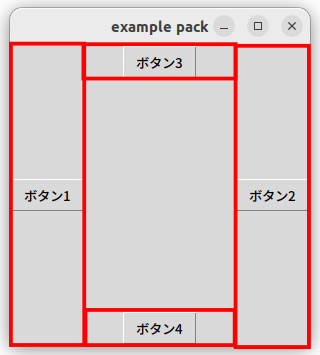
packで説明していませんでしたが、配置したそれぞれのボタンの専有領域は右図の赤の領域になります。packした順番が重要であることに留意してください。
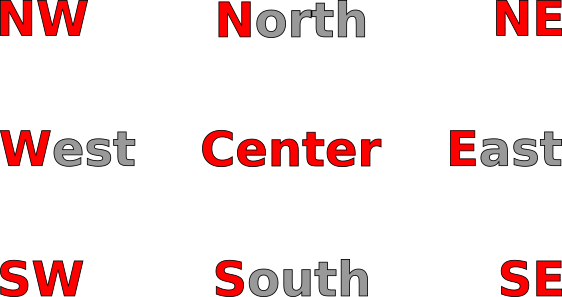
anchorはsideによる指定とpackの順番により決定された領域内の位置を指定します。位置の指定は東西南北で指定します。
|
1 2 3 4 |
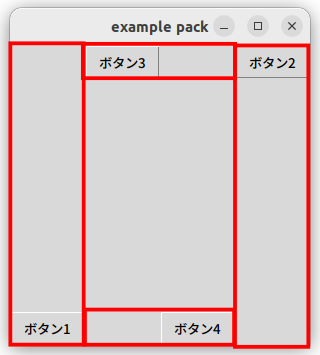
btn1.pack(side=tk.LEFT, anchor="s") btn2.pack(side="right", anchor="n") btn3.pack(side=tk.TOP, anchor="w") btn4.pack(side=tk.BOTTOM, anchor="e") |
この様に方角を指定してみると、右図、Window-6のようにボタンの位置が変化します。
expandの例
expandは余剰の領域まで拡大することを指定する。具体的にはexpand = True or Falseと指定する。
|
1 2 3 4 |
btn1.pack(side=tk.LEFT, anchor="s") btn2.pack(side="right", anchor="n") btn3.pack(side=tk.TOP, anchor="w") btn4.pack(side=tk.BOTTOM, anchor="ne", expand=True) |
ボタン4の領域が余剰領域へ拡大された事がわかる。anchorをNorth Eastに変更しているので、領域内の右上にボタンが表示されていることにも注意してほしい。
では、複数のWidgitのPackのexpandを有効にしたらどうなるのだろうか?

|
1 2 3 4 |
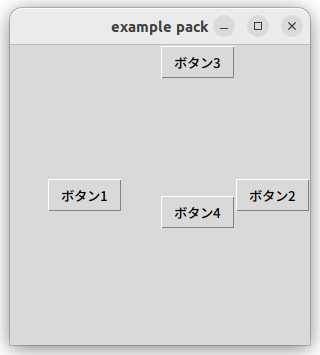
btn1.pack(side=tk.LEFT, anchor="center", expand=True) btn2.pack(side="right", anchor="center") btn3.pack(side=tk.TOP, anchor="center") btn4.pack(side=tk.BOTTOM, anchor="center", expand=True) |
ボタン1にもexpandを有効にして、anchorはすべて”center"にしてみた。いったいボタンの占有領域はどうなっているのだろう?良くわからない。そこで、次の説明に移って、それぞれのボタンがどの様な領域を占有しているのか確認してみよう。
fillの例
fillはWidgetを領域内まで拡張します。占有領域内を縦のみ、横のみまたは両方向に引き伸ばすことが可能です。この機能を利用すれば、領域内いっぱいにボタンを拡大することができます。expandの例で各Widgitの領域がわからなくなった例を利用して、領域を確認してみましょう。
|
1 2 3 4 |
btn1.pack(side=tk.LEFT, anchor="center", expand=True, fill="both") btn2.pack(side="right", anchor="center", fill="both") btn3.pack(side=tk.TOP, anchor="center", fill="both") btn4.pack(side=tk.BOTTOM, anchor="center", expand=True, fill="both") |
すべてのボタンのpackに'fill="both"'を設定しました。実行してみると右図のようにボタンが領域全体に拡大された事がわかります。
ボタン1がかなり欲張っていますね。
もうすこしexpandの理解を深めるために、packの順番を変えて試してみましょう。
|
1 2 3 4 |
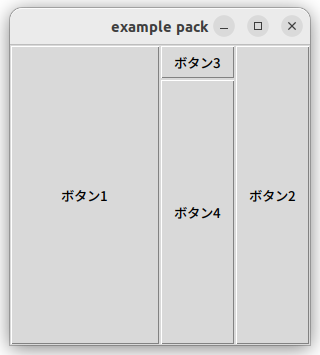
btn1.pack(side=tk.LEFT, anchor="center", expand=True, fill="both") btn2.pack(side="right", anchor="center", fill="both") btn3.pack(side=tk.TOP, anchor="center", expand=True, fill="both") btn4.pack(side=tk.BOTTOM, anchor="center", expand=True, fill="both") |
ボタン3もexpandを有効にしてみました。こちらは4番のボタンと仲良く半分ずつ領域を2分しました。
|
1 2 3 4 |
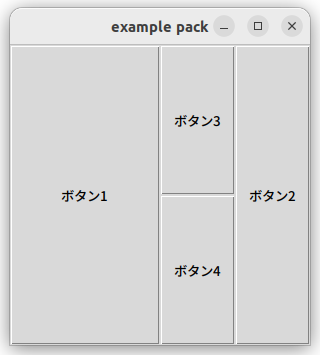
btn4.pack(side=tk.BOTTOM, anchor="center", expand=True, fill="both") btn1.pack(side=tk.LEFT, anchor="center", expand=True, fill="both") btn2.pack(side="right", anchor="center", fill="both") btn3.pack(side=tk.TOP, anchor="center", expand=True, fill="both") |
ボタン4を最初にpackする様に変更してみました。複数のexpandが指定された場合、基本的には領域を二分します。ただし、expandで拡大された領域はあとからpackされたものにその一部を譲ります。
全てのpackにexpandを有効にすると...
|
1 2 3 4 |
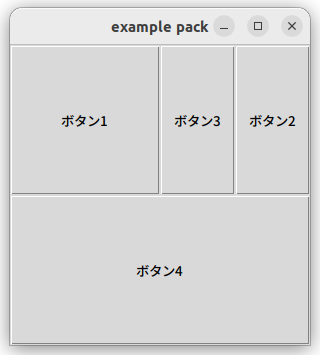
btn4.pack(side=tk.BOTTOM, anchor="center", expand=True, fill="both") btn1.pack(side=tk.LEFT, anchor="center", expand=True, fill="both") btn2.pack(side="right", anchor="center", expand=True, fill="both") btn3.pack(side=tk.TOP, anchor="center", expand=True, fill="both") |
ちょっと複雑になってよくわからない...
一つずつpackしてみるとわかるのですが、領域を二分するには直交する軸ではなく、水平または垂直な軸方向のみ?の様に見えます。
ボタン3をpackする前の状態を見てみましょう。
|
1 2 3 4 |
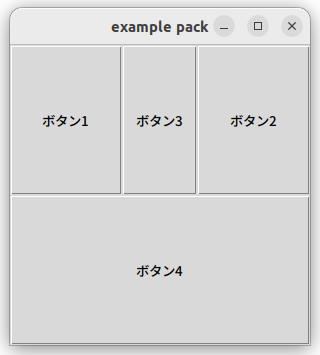
btn4.pack(side=tk.BOTTOM, anchor="center", expand=True, fill="both") btn1.pack(side=tk.LEFT, anchor="center", expand=True, fill="both") btn2.pack(side="right", anchor="center", expand=True, fill="both") #btn3.pack(side=tk.TOP, anchor="center", expand=True, fill="both") |
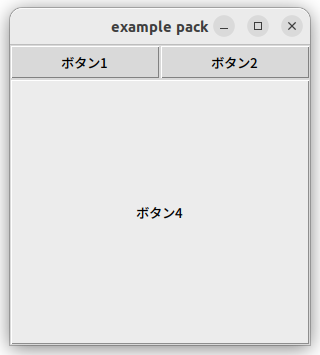
最初にpackされたボタン4(BOTTOMに配置)は最小限の領域しかボタン1(LEFTに配置)に専有領域を割譲していません。ボタン1(LEFT)はボタン2(RIGHT)と左右の水平方向に領域を二分しています。
これにボタン3(TOP)をpackするとボタン4(BOTTOM)はTOP↔BOTTOMの垂直方向に領域を二分してボタン3に割譲しています(前図、Window-12)。ボタン1とボタン2はボタン3に最小限の領域しか割譲していません。
pad及びipadについて
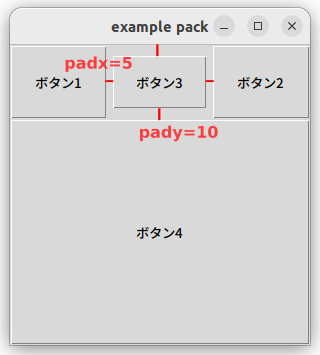
padding 余白および Internal padding 内部余白です。実際に設定してみましょう
まずは、素で
|
1 2 3 4 |
btn4.pack(side=tk.BOTTOM, anchor="center", expand=True, fill="both") btn1.pack(side=tk.LEFT, anchor="center", expand=True, fill="both") btn2.pack(side="right", anchor="center", expand=True, fill="both") btn3.pack(side=tk.TOP, anchor="center", fill=None) |
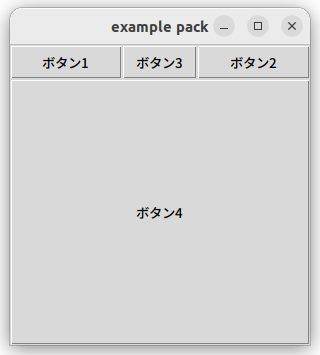
内部余白を設定することで、ボタンが大きくなっています。余白はその他のWidgitとの間に隙間ができています。
|
1 2 3 4 |
btn4.pack(side=tk.BOTTOM, anchor="center", expand=True, fill="both") btn1.pack(side=tk.LEFT, anchor="center", expand=True, fill="both") btn2.pack(side="right", anchor="center", expand=True, fill="both") btn3.pack(side=tk.TOP, anchor="center", fill=None, padx=5, pady=10, ipadx=10, ipady=10) |
Frameのpack
Frameはwidgitと異なり、具体的な大きさがない場合、他のFrameやWidgitのexpandがTrueであると、押しやられてしまうことに注意が必要
この状況は1〜4のFrameのsideがLEFTで、Frame_5がBOTTOMであることも一因。Frame2、3,4は等分されている。
|
1 2 3 4 5 6 7 8 9 10 11 12 13 14 15 16 17 18 19 20 21 |
import tkinter as tk root = tk.Tk() root.title('example pack') root.geometry('300x400') frame_1 = tk.Frame(root, width=100, height=200, bg="red") frame_2 = tk.Frame(root, bg="green") frame_3 = tk.Frame(root, bg ="blue") frame_4 = tk.Frame(root, bg="yellow") frame_5 = tk.Frame(root, bg="blue") frame_5.pack(side=tk.BOTTOM, expand=True, fill=tk.BOTH) frame_1.pack(side=tk.LEFT) frame_2.pack(side=tk.LEFT, expand=True, fill=tk.BOTH) frame_3.pack(side=tk.LEFT, expand=True, fill=tk.BOTH) frame_4.pack(side=tk.LEFT, expand=True, fill=tk.BOTH) root.mainloop() |
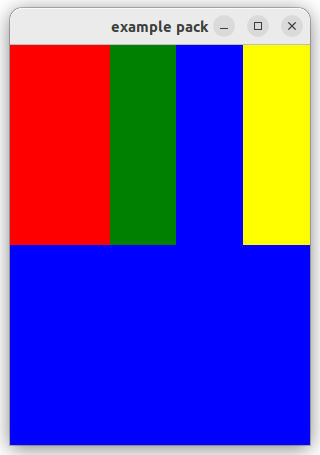
Frame_1の大きさの指定を削除すると、最初にpackされたFrame_5に押しやられてしまう。
|
1 2 3 4 5 6 7 8 9 10 11 12 13 14 15 16 17 18 19 20 21 |
import tkinter as tk root = tk.Tk() root.title('example pack') root.geometry('300x400') frame_1 = tk.Frame(root, bg="red") frame_2 = tk.Frame(root, bg="green") frame_3 = tk.Frame(root, bg ="blue") frame_4 = tk.Frame(root, bg="yellow") frame_5 = tk.Frame(root, bg="blue") frame_5.pack(side=tk.BOTTOM, expand=True, fill=tk.BOTH) frame_1.pack(side=tk.LEFT) frame_2.pack(side=tk.LEFT, expand=True, fill=tk.BOTH) frame_3.pack(side=tk.LEFT, expand=True, fill=tk.BOTH) frame_4.pack(side=tk.LEFT, expand=True, fill=tk.BOTH) root.mainloop() |
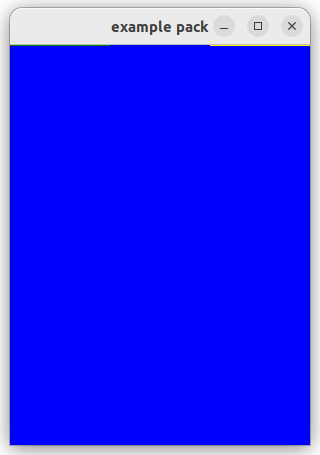
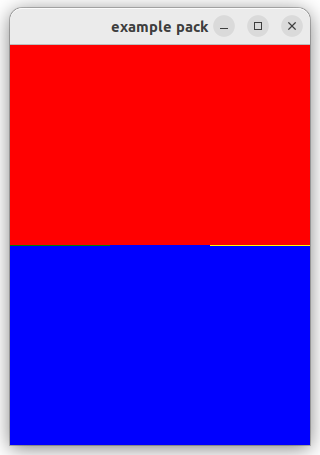
Frame_1のpackをTOPにして、expand=Trueおよびfill=tk.BOTHとすることで、sideのTOP↔BOTTOMでは2分割される。
Frame_2〜Frame_4は潰れてしまう。最初の例ではsideのLEFT↔RIGHT間では等分に分割されていた。
これはボタンの配置のときと同じですね。
|
1 2 3 4 5 6 7 8 9 10 11 12 13 14 15 16 17 18 19 20 21 |
import tkinter as tk root = tk.Tk() root.title('example pack') root.geometry('300x400') frame_1 = tk.Frame(root, bg="red") frame_2 = tk.Frame(root, bg="green") frame_3 = tk.Frame(root, bg ="blue") frame_4 = tk.Frame(root, bg="yellow") frame_5 = tk.Frame(root, bg="blue") frame_5.pack(side=tk.BOTTOM, expand=True, fill=tk.BOTH) frame_1.pack(side=tk.TOP, expand=True, fill=tk.BOTH) frame_2.pack(side=tk.LEFT, expand=True, fill=tk.BOTH) frame_3.pack(side=tk.LEFT, expand=True, fill=tk.BOTH) frame_4.pack(side=tk.LEFT, expand=True, fill=tk.BOTH) root.mainloop() |
まとめ
設定値によっては相反するのか、オプションが反映されないように見える事があります。それぞれのオプションの優先順位について言及しないといけないのかもしれません。この点については長くなるので、別投稿でまとめてみようと思います。
- 追記 -
befor と after に言及していなかった... これは pack 記述する順番ではなく、明示的に順番を指定する方法で良いのかな?
使ったこと無いので、今度試してみる。
参考資料
tkinter オフィシャルサイト https://docs.python.org/3/library/tkinter.html
tcl/tk オフィシャルサイト https://www.tcl.tk/
Tcl/Tk マニュアルページ pack https://www.tcl.tk/man/tcl/TkCmd/pack.html

